How to Turn a Photo Into a 3D Figurine That Still Looks Like You
Learn how to create a recognizable AI collectible figurine from one photo, choose a useful source image, write a material-aware prompt, and avoid glossy toy-like results.
To create a convincing AI figurine from a photo, the model needs to preserve the subject's identity while changing the material, scale, pose, and presentation.
That balance is the whole job. If the prompt focuses only on identity, the result can look like a small living person. If it focuses only on “3D toy,” the face, outfit, proportions, and character may drift into a generic plastic avatar.
The Collectible Figurine template in Nenis handles both sides: it protects the recognizable subject, then renders one premium hand-painted resin collectible in a believable display scene.
The quick workflow
- Upload one clear photograph of a person or pet.
- Choose a creator desk, display shelf, or studio pedestal.
- Add one meaningful accessory only if it helps tell the subject's story.
- Generate one High-quality
3:4result. - Check the face, outfit, hands or paws, material, scale, base, and subject count.
The template uses Nano Banana 2 at High quality by default. It is a useful fit for this transformation because the source image controls identity and clothing while the prompt asks for a new physical object, pose, base, and environment.
Choose a source photo that describes the whole subject
A full-body photograph is the most useful input because it shows the model how the face, hair, outfit, body proportions, shoes, and accessories relate to each other.
Use a photo with:
- One clear primary subject.
- The complete head, hands or paws, body, and feet visible when possible.
- Natural perspective without an extreme wide-angle distortion.
- Even light across the face and outfit.
- Enough resolution to see hair texture, fabric, markings, and small accessories.
- Minimal overlap from furniture, other people, or foreground objects.
A portrait crop can still work, but the model must invent the missing clothing and body. If you care about the exact outfit, provide a full-body image rather than trying to describe unseen details afterward.
For a pet, choose a photo that clearly shows the breed traits, face shape, markings, fur pattern, eye color, body proportions, and collar or bandana.
Tell the model what the figurine is made from
“Turn this into a toy” is too broad. It can produce vinyl, glossy molded plastic, a bobblehead, an action figure with visible joints, or a nearly human miniature.
A stronger material direction is:
Transform the single primary subject into one premium 1/7-scale collectible figurine.

Preserve the subject's recognizable facial structure, apparent age, skin tone, eyes, hair, expression, body proportions, outfit, accessories, and colors.

Render the figure as hand-painted cold-cast resin or polystone with a refined matte sealed finish, sculpted hair strands, crisp fabric folds, subtle painted gradients, and believable miniature manufacturing detail.

Keep natural collectible proportions with no oversized head. Show the complete figurine from head to base in a stable three-quarter display pose.

Avoid glossy plastic, vinyl, living human skin, a shrunken real person, a mannequin, a bobblehead, chibi proportions, joints, articulation pins, extra limbs, duplicate subjects, text, logos, or watermarks.
The material terms do more than add style. They tell the model how skin, hair, fabric, highlights, and edges should behave at miniature scale.
Choose a display scene
The environment proves that the result is a collectible rather than a full-size person pasted into another photograph.
| Scene | Best for | Main visual cue |
|---|---|---|
| Creator desk | A detailed, story-led result | Acrylic base, tools, sculpting screen, presentation box |
| Display shelf | A clean collector aesthetic | Warm spotlight, glass and wood, negative space |
| Studio pedestal | The simplest product-style image | Small stone pedestal, seamless neutral background |
Use the creator desk when you want the image to communicate the design process. Choose the shelf when the finished collectible matters more than the surrounding story. Use the pedestal when you need a clean image that can fit into a product page, portfolio, or social layout.
Do not overload the scene. Multiple boxes, figures, props, logos, and screens compete with the subject and make duplicate-person errors more likely.
Compare the source and figurine
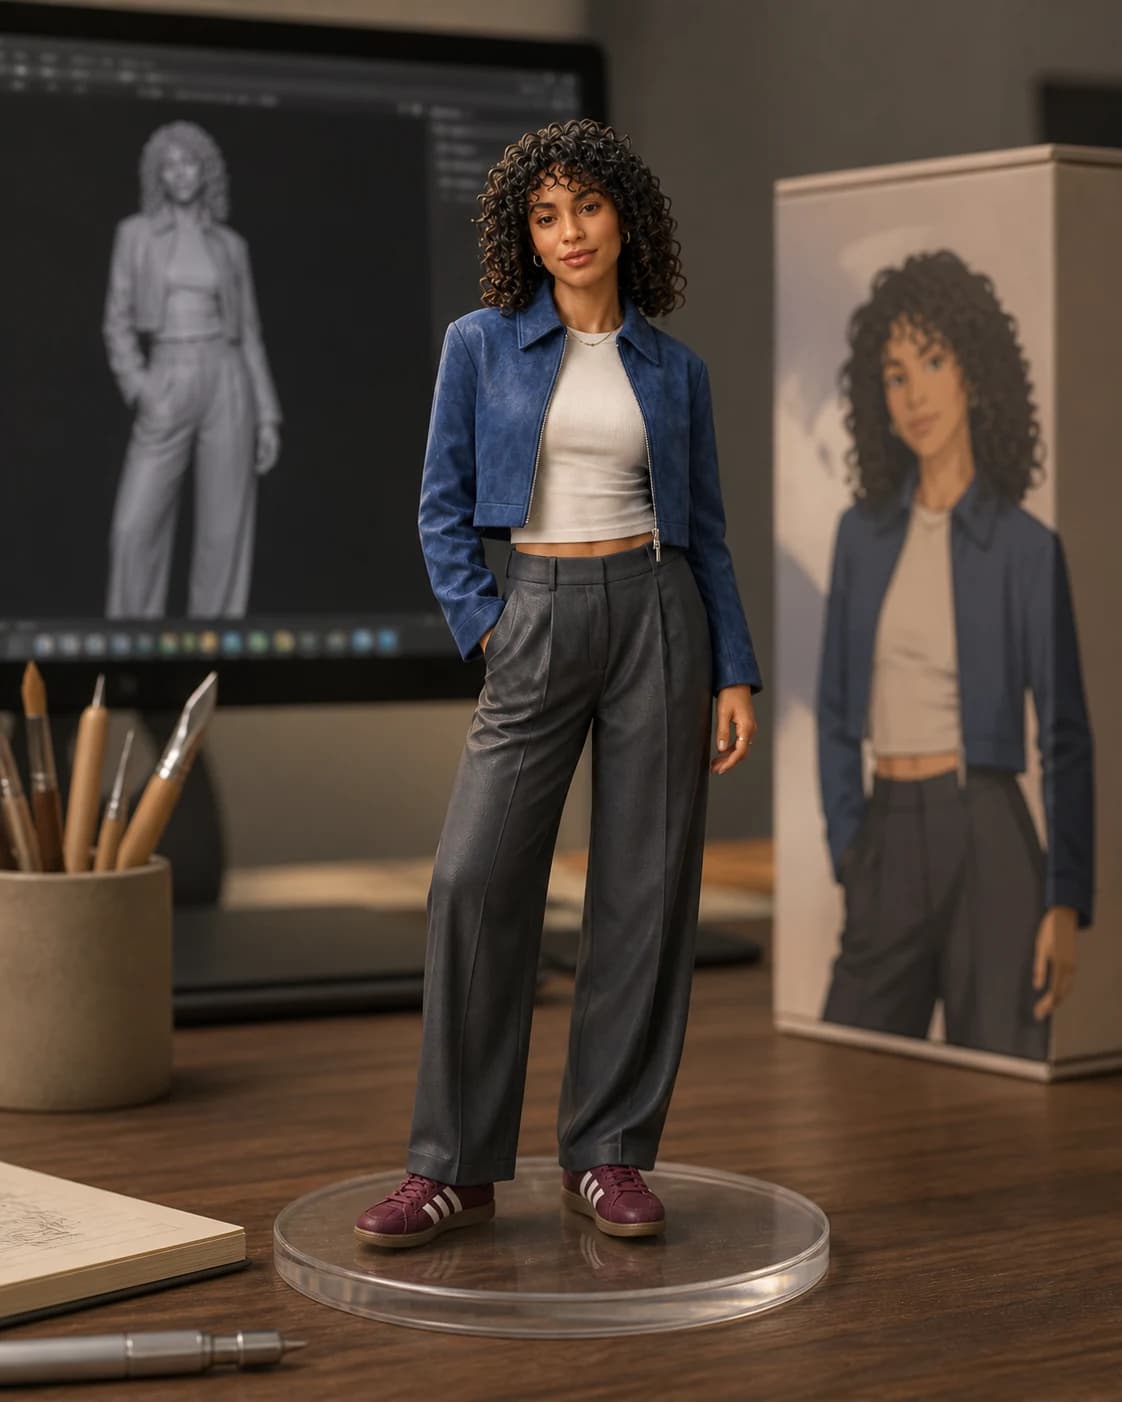
The example below uses a fictional full-body subject. The result keeps the recognizable face, curls, cropped blue jacket, cream top, charcoal trousers, burgundy shoes, and relaxed character while changing the person into a matte resin collectible on a clear base.
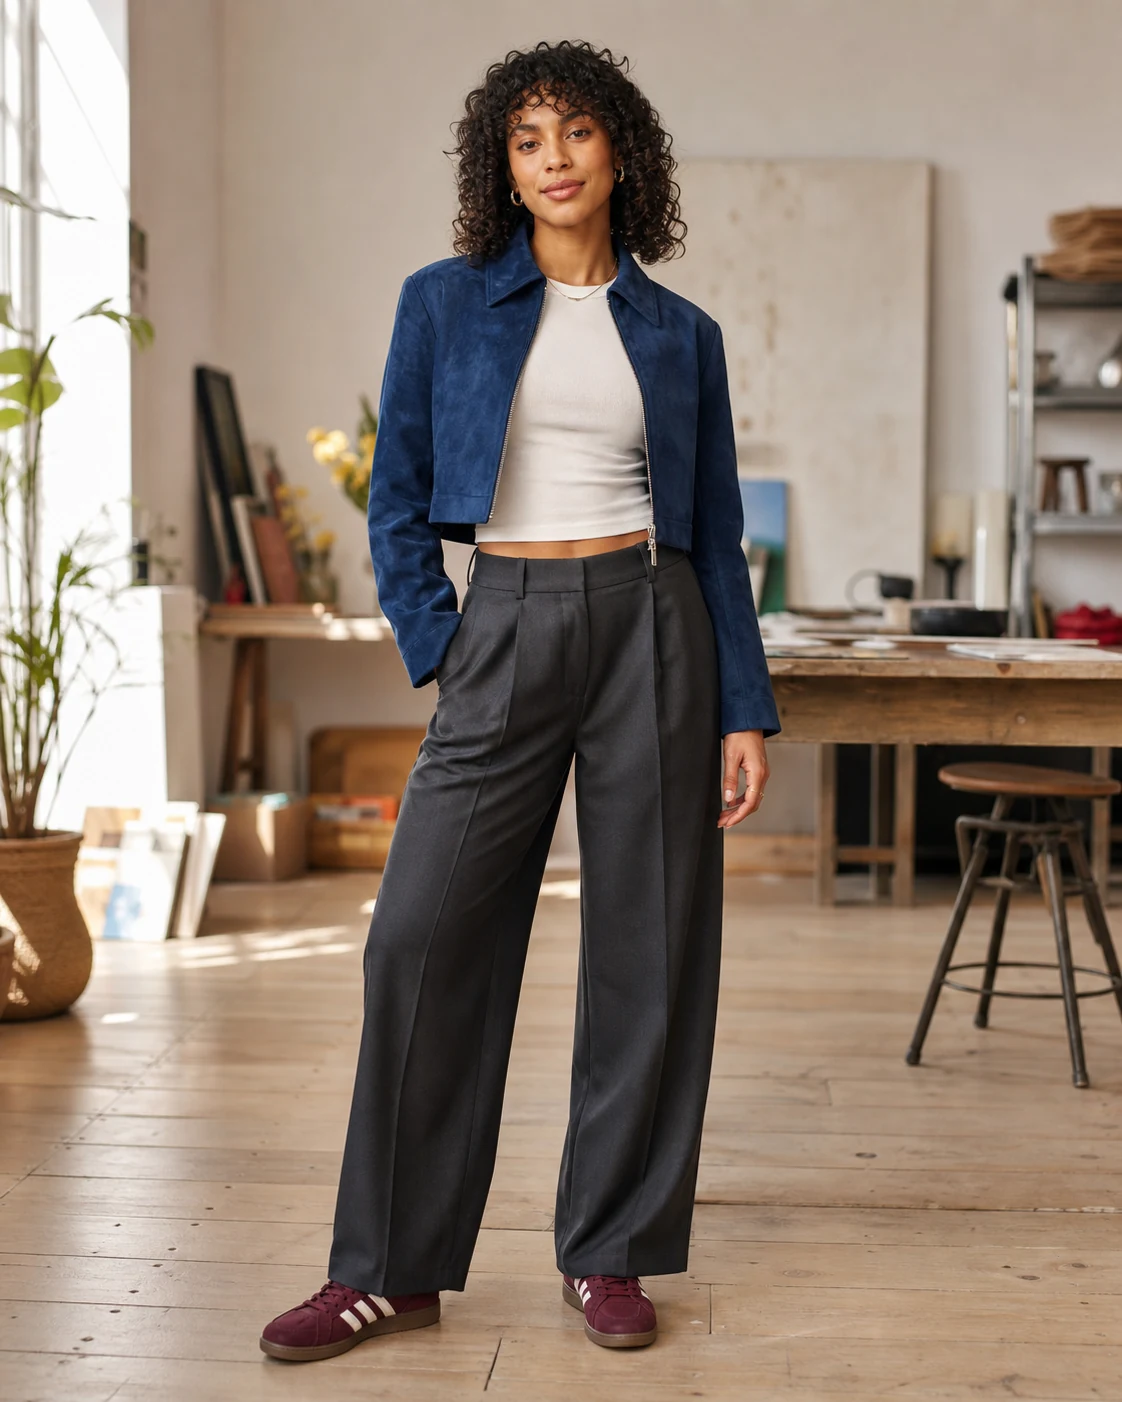
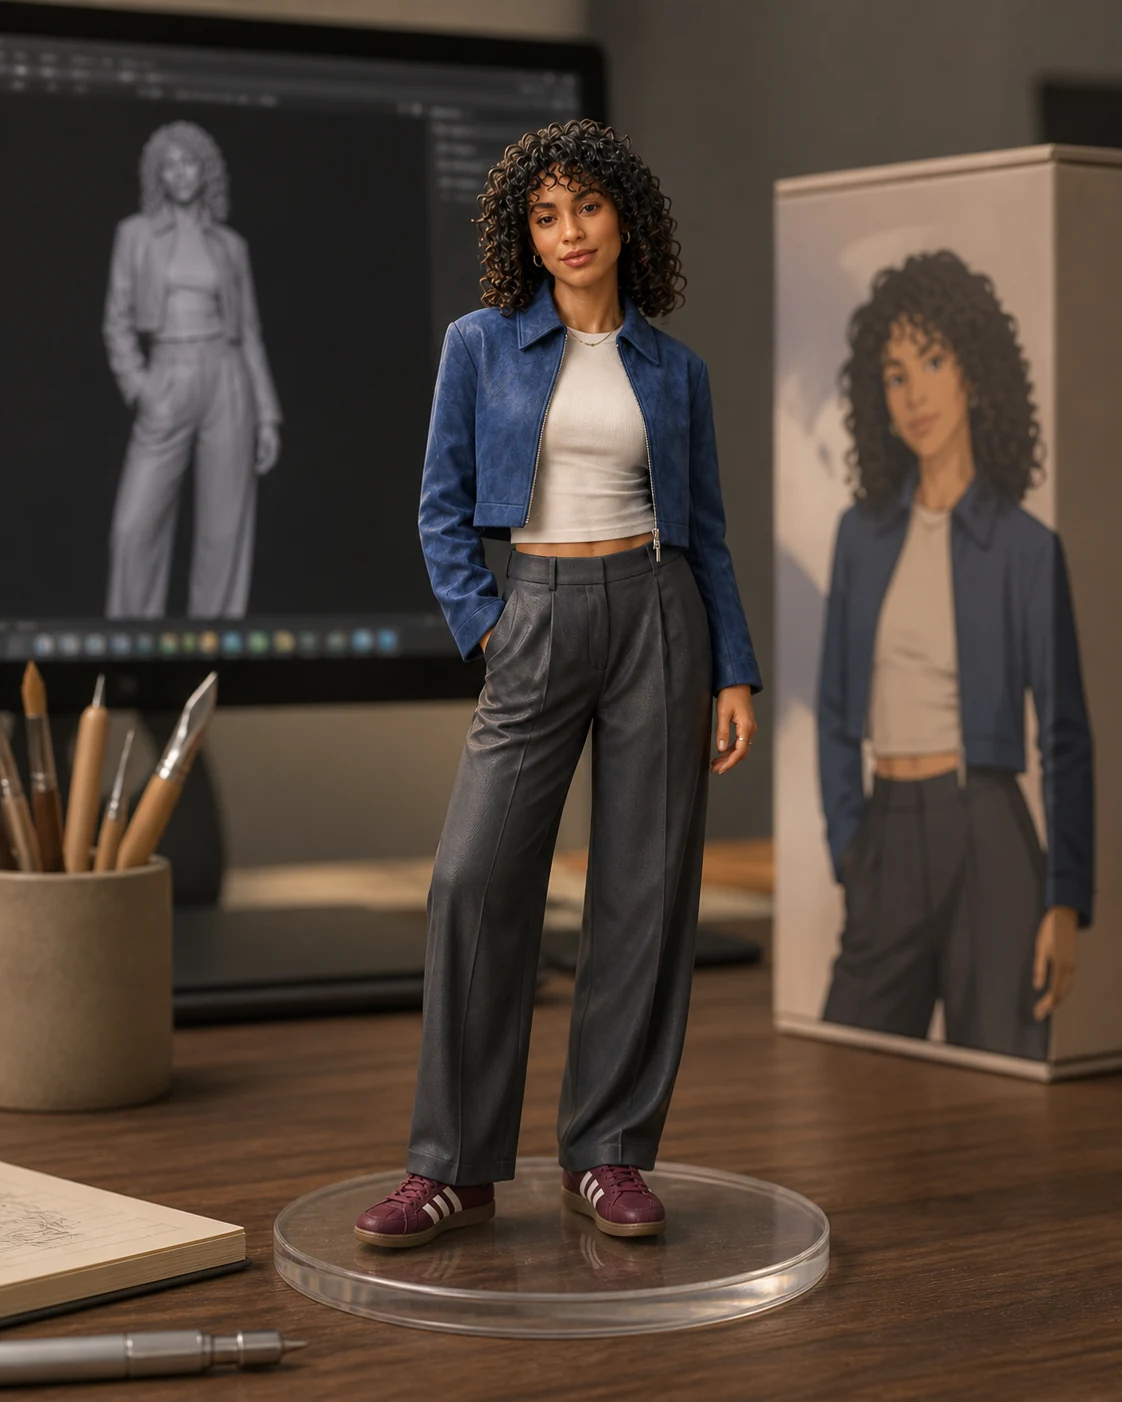
The pose is not copied mechanically. A figurine needs a stable stance that reads well from a product-photography angle. What should remain stable is the identity, character, outfit, proportions, and distinctive visual details.
If you need stronger control over several source images, read How to use reference images in AI.
Add accessories without losing the subject
An accessory works best when it is small, specific, and visually connected to the subject.
Good instructions include:
- Add a tiny camera beside the subject's foot.
- Include a miniature sketchbook held in one hand.
- Add a small red guitar resting against the base.
- Place a tiny tennis racket on the pedestal.
- Keep the pet's existing blue collar.
Avoid asking for a complete branded package, a shelf full of related figures, and several handheld props in the same generation. Every additional object introduces another chance for copied text, malformed hands, confused scale, or duplicate characters.
For the first result, let the template solve identity and material. Add one accessory only after the core figurine looks right.
Fix common figurine failures
It looks like a living miniature person
Strengthen the material description: hand-painted resin, matte sealed finish, simplified sculpted surface detail, carved hair strands, and miniature manufacturing cues. Keep the acrylic base and a clear scale reference in the scene.
It looks like cheap plastic
Exclude glossy molded plastic, vinyl, blister packaging, visible joints, and toy-store styling. Ask for controlled studio highlights rather than a broad plastic shine.
The head is too large
Request natural collectible proportions, no oversized head, and no chibi or bobblehead styling. A 1/7-scale description helps establish an adult collector-figure language.
The face no longer looks like the subject
Use a clearer source photograph and remove competing style references. Name the visible features that matter—face shape, hairline, hairstyle, expression, glasses, facial hair, or markings—without asking the model to beautify or redesign them.
There are two figurines or extra limbs
State “exactly one figurine” and keep the display scene simple. Check hands, fingers, feet, base contact, reflections, screens, and packaging art because duplicates can appear in the background as well as beside the subject.
The body is cropped
Use a vertical 3:4 composition and ask for the complete figure from head to base with comfortable margins. A source image that already includes the feet gives the model better proportion information.
When a generated figurine is not enough
This workflow creates an image of a collectible. It does not create a production-ready 3D mesh, engineering drawing, mold, or printable STL file.
If you want to manufacture a physical figure, a 3D artist still needs to model the character, solve unseen angles, create watertight geometry, plan joints and supports, choose materials, test structural stability, and prepare the asset for the selected production method.
Use the AI image as a concept reference, presentation visual, gift idea, character study, or brief for a 3D artist—not as a fabrication file.
The recommendation
Start with one sharp full-body photo and the creator-desk scene. Generate one result before adding accessories. The figurine should remain recognizable while clearly looking like a crafted matte resin object at miniature scale.
Preserve identity. Specify material. Keep the scene restrained. Then add one personal detail.
Sources and image credits
The workflow reflects the live Nenis Collectible Figurine template and Google's official Gemini image generation documentation for Nano Banana 2 image editing and reference workflows. The before-and-after example uses a fictional subject created for the Nenis template.